Saturday, May 4, 2013

Real Math, Real Shapes

On Fridays in our Kindergarten class, we have our two classes (AM and PM) join together for the morning. It can be an intense time with 30 kinders all in the same small room.

To help alleviate the pressure on everyone in the room, I help with centre time. I usually try to do something on the iPads but sometimes struggle as we only have centre time for 45 minutes at the most.

This week I tried something that would hopefully take 45 mins at the most.

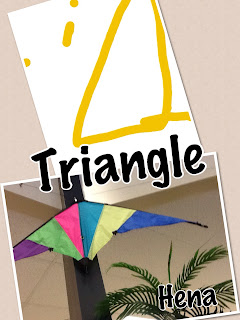
We wanted the kinders to relate 2 dimensional shapes with real world objects. To do this we used three apps; The camera app, PicCollage App and Doodle Buddy App.

Drawing in Doodle Buddy
First, the students drew a shape in the Doodle Buddy App. We kept this simple to save time. Once finished they exported their drawing to the camera roll.


Taking pictures of Real World Shapes
Students then found an object that matched their chosen shape and took a picture of it.


Putting it all together in Pic Collage
Inserting images and text into PicCollage is an easy process. The students mastered this within a couple of minutes. We used a word list for the shape names each student needed.

Exporting from the PicCollage App
The usual export button (the box with the arrow popping out) is the important button in this app for exporting the Pic Collage to the camera roll. See the images below to see what it should look like. 


The Finished Pieces
Approximately 30 minutes later, this is what the students had produced. AWESOME!

Easy eBooks - Book Creator App

We discovered Book Creator App a couple of months ago and since then it's really catching on as a great option for creating beautiful looking ePub Books. We currently have a few different grades doing projects with this App.


This particular project is a grade 1-2 class who are writing their own books inspired by Eric Carle's Brown Bear, Brown Bear, What Do You See?

The Process

Pictures of puppets: 
The students took photos of their puppets in the pose they wanted. For the most part this was an easy task but we sometimes needed to talk about how to take good pictures using an iPad. We are finding that our students have improved so much with their iPad picture taking skills. As it often does, practice makes almost perfect!

Inserting Pictures: 
The Book Creator App just underwent a fairly major update and it changed the way that pictures can be inserted into books. Previously, we had to take all the pictures in the camera app and then insert them. Now, users can insert them directly from the app by taking pictures on the go. 

We had the students inserting all the pictures into the book first before they entered any voice, or text. I think this strategy helped develop the framework of the book so the students could see how much they had completed and how much was left to do.


Entering Text:
We then entered text using our collection of words we had previously written on sheets of paper. These sheets of paper were scattered over the desks and students were encouraged to find the words themselves. Some students required the base sentences written down as a guide.
_____ ______ WHAT DO YOU SEE?
I SEE A _______ LOOKING AT ME.
I wrote these in capital letters as some of our emergent writers had trouble locating letters on keyboard as they are upper case on most keyboards.


Recording Voice-Over:
The voice over recording was the most exciting part. Students loved recording their own voice and doing so with expression. Once finished, students listened through their recordings to see if they wanted/needed to edit anything.

Exporting to iTunes/iBooks:
As always, the important when working on iPads is taking the work off the device. Book Creator allows you to share books by opening them in another ePub friendly app such as iBooks or Kobo. The other option for exporting the book is to Send it to iTunes (see image below). This worked best for us as I manage the iPads and it was easy enough to move a copy of the book (PDF and ePub) to a computer. Once off the iPad you can share with other people or put it on the classroom iPad as a reading activity. 
This shows the export window and the options of 'Send to iTunes' or  'Open in Another App'.

Here is an example of a published book in action. Please note: this example was from a kindergarten project using the same App.

Friday, May 3, 2013

Collaborative Research, QRCodes & Google Docs

One way we have experimented in using the new CBE GAFE (Google Apps For Education) Google docs was to create a Google form to collate the collective research efforts of an entire class. This way, we could collaborate to gather a lot of information (about Ancient Greece). 


Students who researched online would just open another tab or separate web page to access the Google form. For those who were using text books and other non-fiction books from our learning commons, we assigned a QR code to the form and students opened the form using a QR reader on the iPad. This allowed then fast access to the Form so they could easily enter their information like everybody else.


Like I have mentioned before, we use the QRafter app for our iPads but there are many free QR readers for iPads and other other mobile devices. A bonus to the app would be the ability to create QR codes too - In my experience, this is usually a paid feature or upgrade.


The form was a simple way to collate information that the students gathered. We used a drop-down choice for the research category so we could easily sort the information afterward. After the information was gathered students then used the collaborated information to create their own project of choice about democracy in Ancient Athens.

Below is the collated information we collected:

Finding Text Features and Explaining

Doceri is a screen recording App that allows the user to take pictures and then discuss or explain their understanding of what the picture is about.


In this class we used Doceri to explain our understanding about text features in non-fiction books. Students took pictures of the text feature and then explained what they thought/knew about that particular text feature.


Doceri seems to be a little tricky to use to start with. The navigation of the App is a little tricky to follow. However, once used to it, the App itself is incredibly powerful as it has the ability to post/share on screen using a computer and projector. So far we have only used it on the iPad and then exported it to the Camera Roll to take it off the iPad.


The idea behind this project was to gather a a collection of explanations of different text features and then share them with each other by posting their explanation on their class blog. The posts should soon be created  and posted in which I will link to from this blog post. Here is one example of what these Grade 4 and 5 students made using Doceri.


Thursday, May 2, 2013

Kindergarten Audio Reflections

The power of the voice!

I have been really enjoying creating projects with our iPads that involve recording voice. In the last two weeks, I have been working with our Kindergarten students to record their ideas about being a bucket filler.

In their classroom, the Kindergarten students have been reading the book; "Have you filled a bucket today?" by Carol McCloud. They have discussed what it means to fill someones bucket on a regular basis in their classroom.


As a follow up task, and to share their ideas with others, we decided to capture their thoughts about bucket filling using their classroom iPad. During centre time, I worked with small groups and 1-on-1 with students to show them how to record themselves using a voice recorder app


Once the voice was recorded, the students listened back to see if they were happy with what they had said. If they were, we tried to record more ideas. If they weren't happy, we started again. In this particular project we didn't create any success criteria for voice recording but will definitely look at creating a rubric with them the next time we do this, especially now they have some experience at doing it.


To get the recording off the iPad we exported to the iPad camera roll. It saves as a Quicktime file and can then be downloaded to the Camera Roll. As I manage the iPads, I downloaded each student's files as they were finished, and added them to a album in my iPhoto App. I also shared them with the teacher through a share point in our Community Folder on our school server.


We are still figuring out what we do with the audio now. We're thinking of putting into a video for an assembly next month. Any other ideas out there?